Telepresence 2 Have a Tried
在開發 Kuberentes 應用程式時使用 Skaffold 應該是基本操作了,Skaffold 可以幫忙加速開發的速度 (修改程式碼 → 構建 container image → push container image to registry (optional) → 部署至 Kubernets Cluster),至於是否搭配 Helm 還是直接操作 yaml 就看個人喜好來決定
在 Debug 部份,Skaffold 也支援 Remote container debug 的功能 (之前的文章請參照 Skaffold debug goland)。雖然 Skaffold debug 很方便,不過當 Kubernetes 的應用一多時就沒有辦法在本機端完整的重現有所的服務,這時候開源的 Telepresence 就是一個很好的幫手
Telepresence

Local development against a remote Kubernetes or OpenShift cluster
** Note: Telepresence 1 is being replaced by our even better Telepresence 2. Please try Telepresence 2 first and report any issues as we expect this will be the default by Q2 2021. **

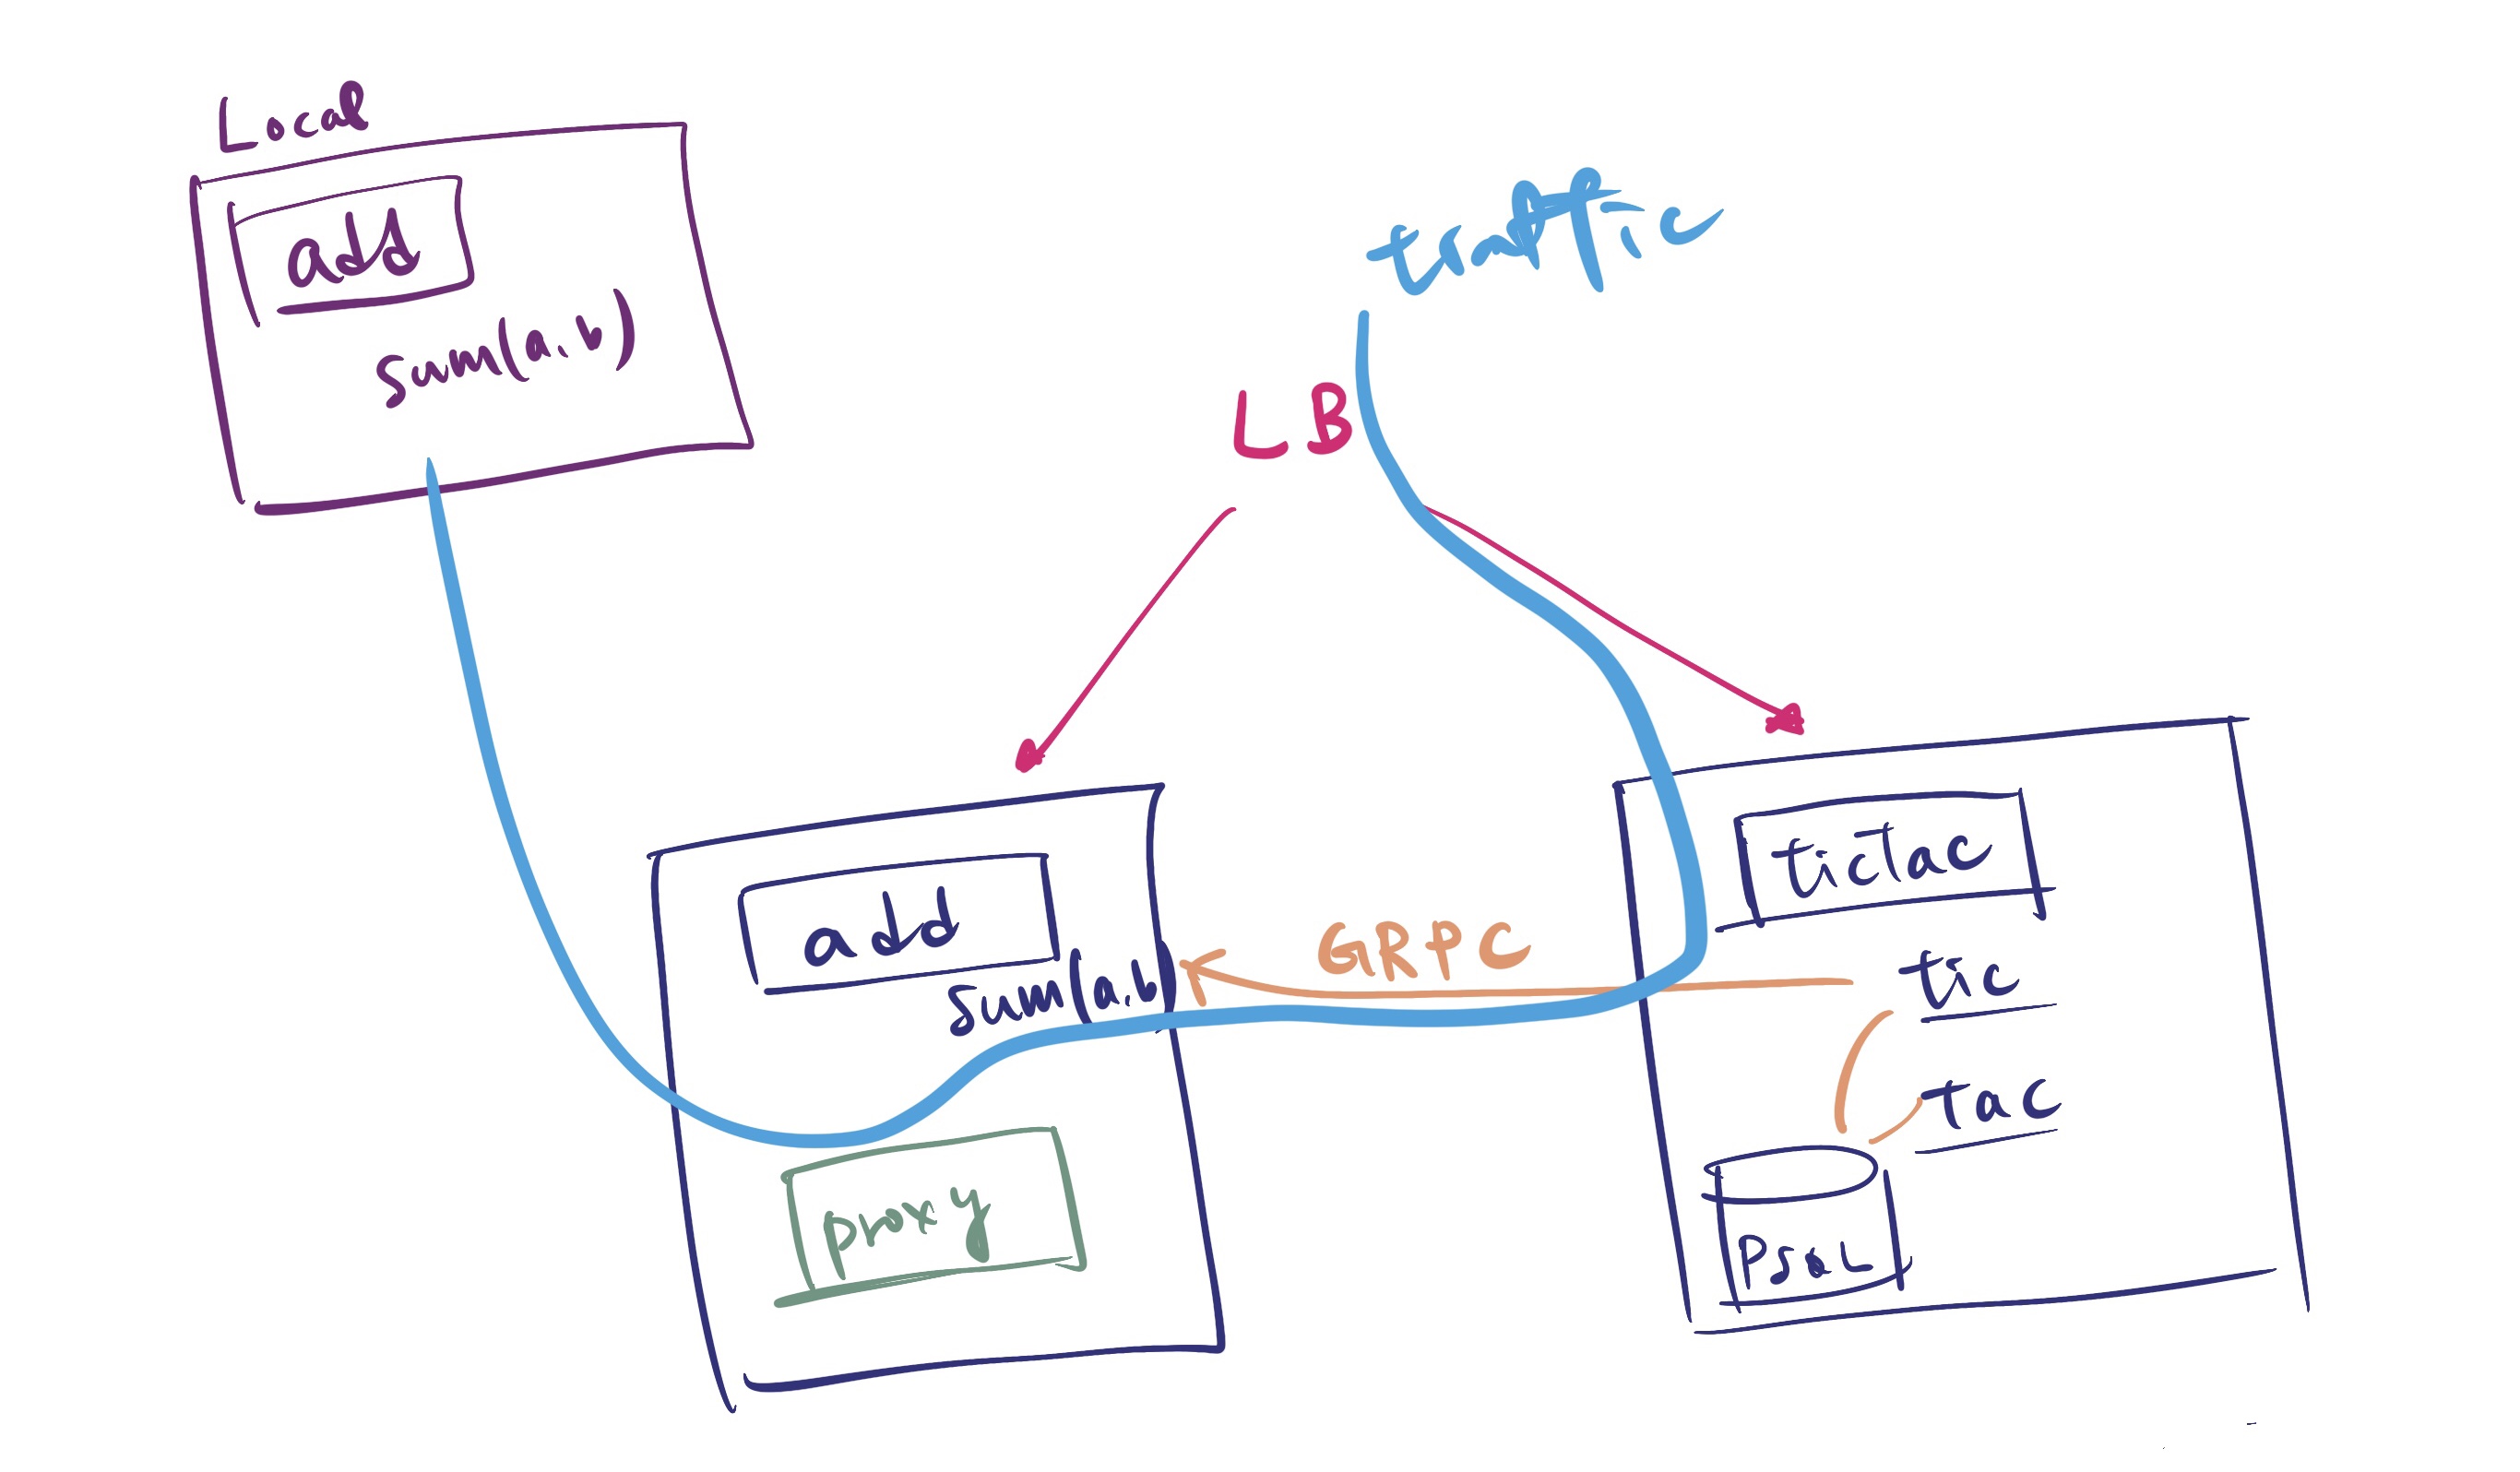
(這邊以 Telepresence 2 為主) 基本上來說 Telepresence 透過 Traffic agent 將所有目標服務的流量/特定 header(“x-telepresence-intercept-id”) 請求重導至本機中,這樣我們就針對單一服務進行快速的進行開發,同時地機端如果也連接至 Kubernets Cluster 其他的資源也是相通的
| |
| |
Telepresence 1.0 跟 2.0 差異很大,2.0 是以 Golang 重新改寫,官方也建議從 2.0 開始,不過 2.0 目前還沒有完全開發完成
| |
第一次操作 Telepresence,會在 Kubernets 中建立 traffic-manager, Traffic-manager 是 Telepresence 2.0 的核心組件也是負責本地 Telepresence Demaons 及目標 Pod 中 Traffice Agent 的溝通
| |
必要的時候可以進行刪除,下一次 Telepresence 重新連線的時候會重建
cage1016/ms-demo
gokit microservice demo
接下來 Demo 就以 cage1016/ms-demo 中的 gokit microservice demo 來進行操作
| Service | Method | Description |
|---|---|---|
| add | Sum | Expose Sum(a,b) method |
| tictac | Tic | Expose Tic method (incrase value by Add Sum GRPC ) |
| tictac | Tac | Expose Tac method (recive value) |
all TCP connections
準個一個可用的 K8s cluster,我們這邊使用 Mac docker-desktop 的 k8s cluster
部署 cage1016/ms-demo: gokit microservice demo
Add,Tictac微服務1kubectl apply -f https://raw.githubusercontent.com/cage1016/ms-demo/master/deployments/kubernetes-manifests-all.yaml1 2 3 4kubectl get po NAME READY STATUS RESTARTS AGE add-68b7f4b486-cqf4m 1/1 Running 0 17m tictac-85f698c88f-cw6mg 2/2 Running 1 17mExpose service,這邊使用的方式為 LoadBalancer
1kubectl apply -f https://raw.githubusercontent.com/cage1016/ms-demo/master/deployments/lb-all.yaml1 2 3 4 5 6 7kubectl get svc NAME TYPE CLUSTER-IP EXTERNAL-IP PORT(S) AGE add ClusterIP 10.97.120.99 <none> 80/TCP,8000/TCP 18m add-external LoadBalancer 10.101.69.142 localhost 8180:31605/TCP,8181:32609/TCP 5m57s kubernetes ClusterIP 10.96.0.1 <none> 443/TCP 5d5h tictac ClusterIP 10.96.191.66 <none> 80/TCP,8000/TCP 18m tictac-external LoadBalancer 10.100.63.131 localhost 9190:30349/TCP,9191:30063/TCP 5m57s設定攔截器,intercept
Addservice namegrpc至本機中10121(GRPC) service,等待指令完成後中顯示會攔截 add service 所有流量至 127.0.0.1:101211 2 3 4 5 6 7 8 9 10telepresence intercept add --service add --port 10121:grpc Using Deployment add intercepted Intercept name : add State : ACTIVE Workload kind : Deployment Destination : 127.0.0.1:10121 Service Port Identifier: grpc Volume Mount Error : macFUSE 4.0.5 or higher is required on your local machine Intercepting : all TCP connections這時候我們可以看到 add Pod 中已經被置入
traffic-agent1 2 3 4 5kubectl iexec add Use the arrow keys to navigate: ↓ ↑ → ← ? Select Container: Container: ▸ add Container: traffic-agent在 cage1016/ms-demo 中進行 Debug,VSCode 中
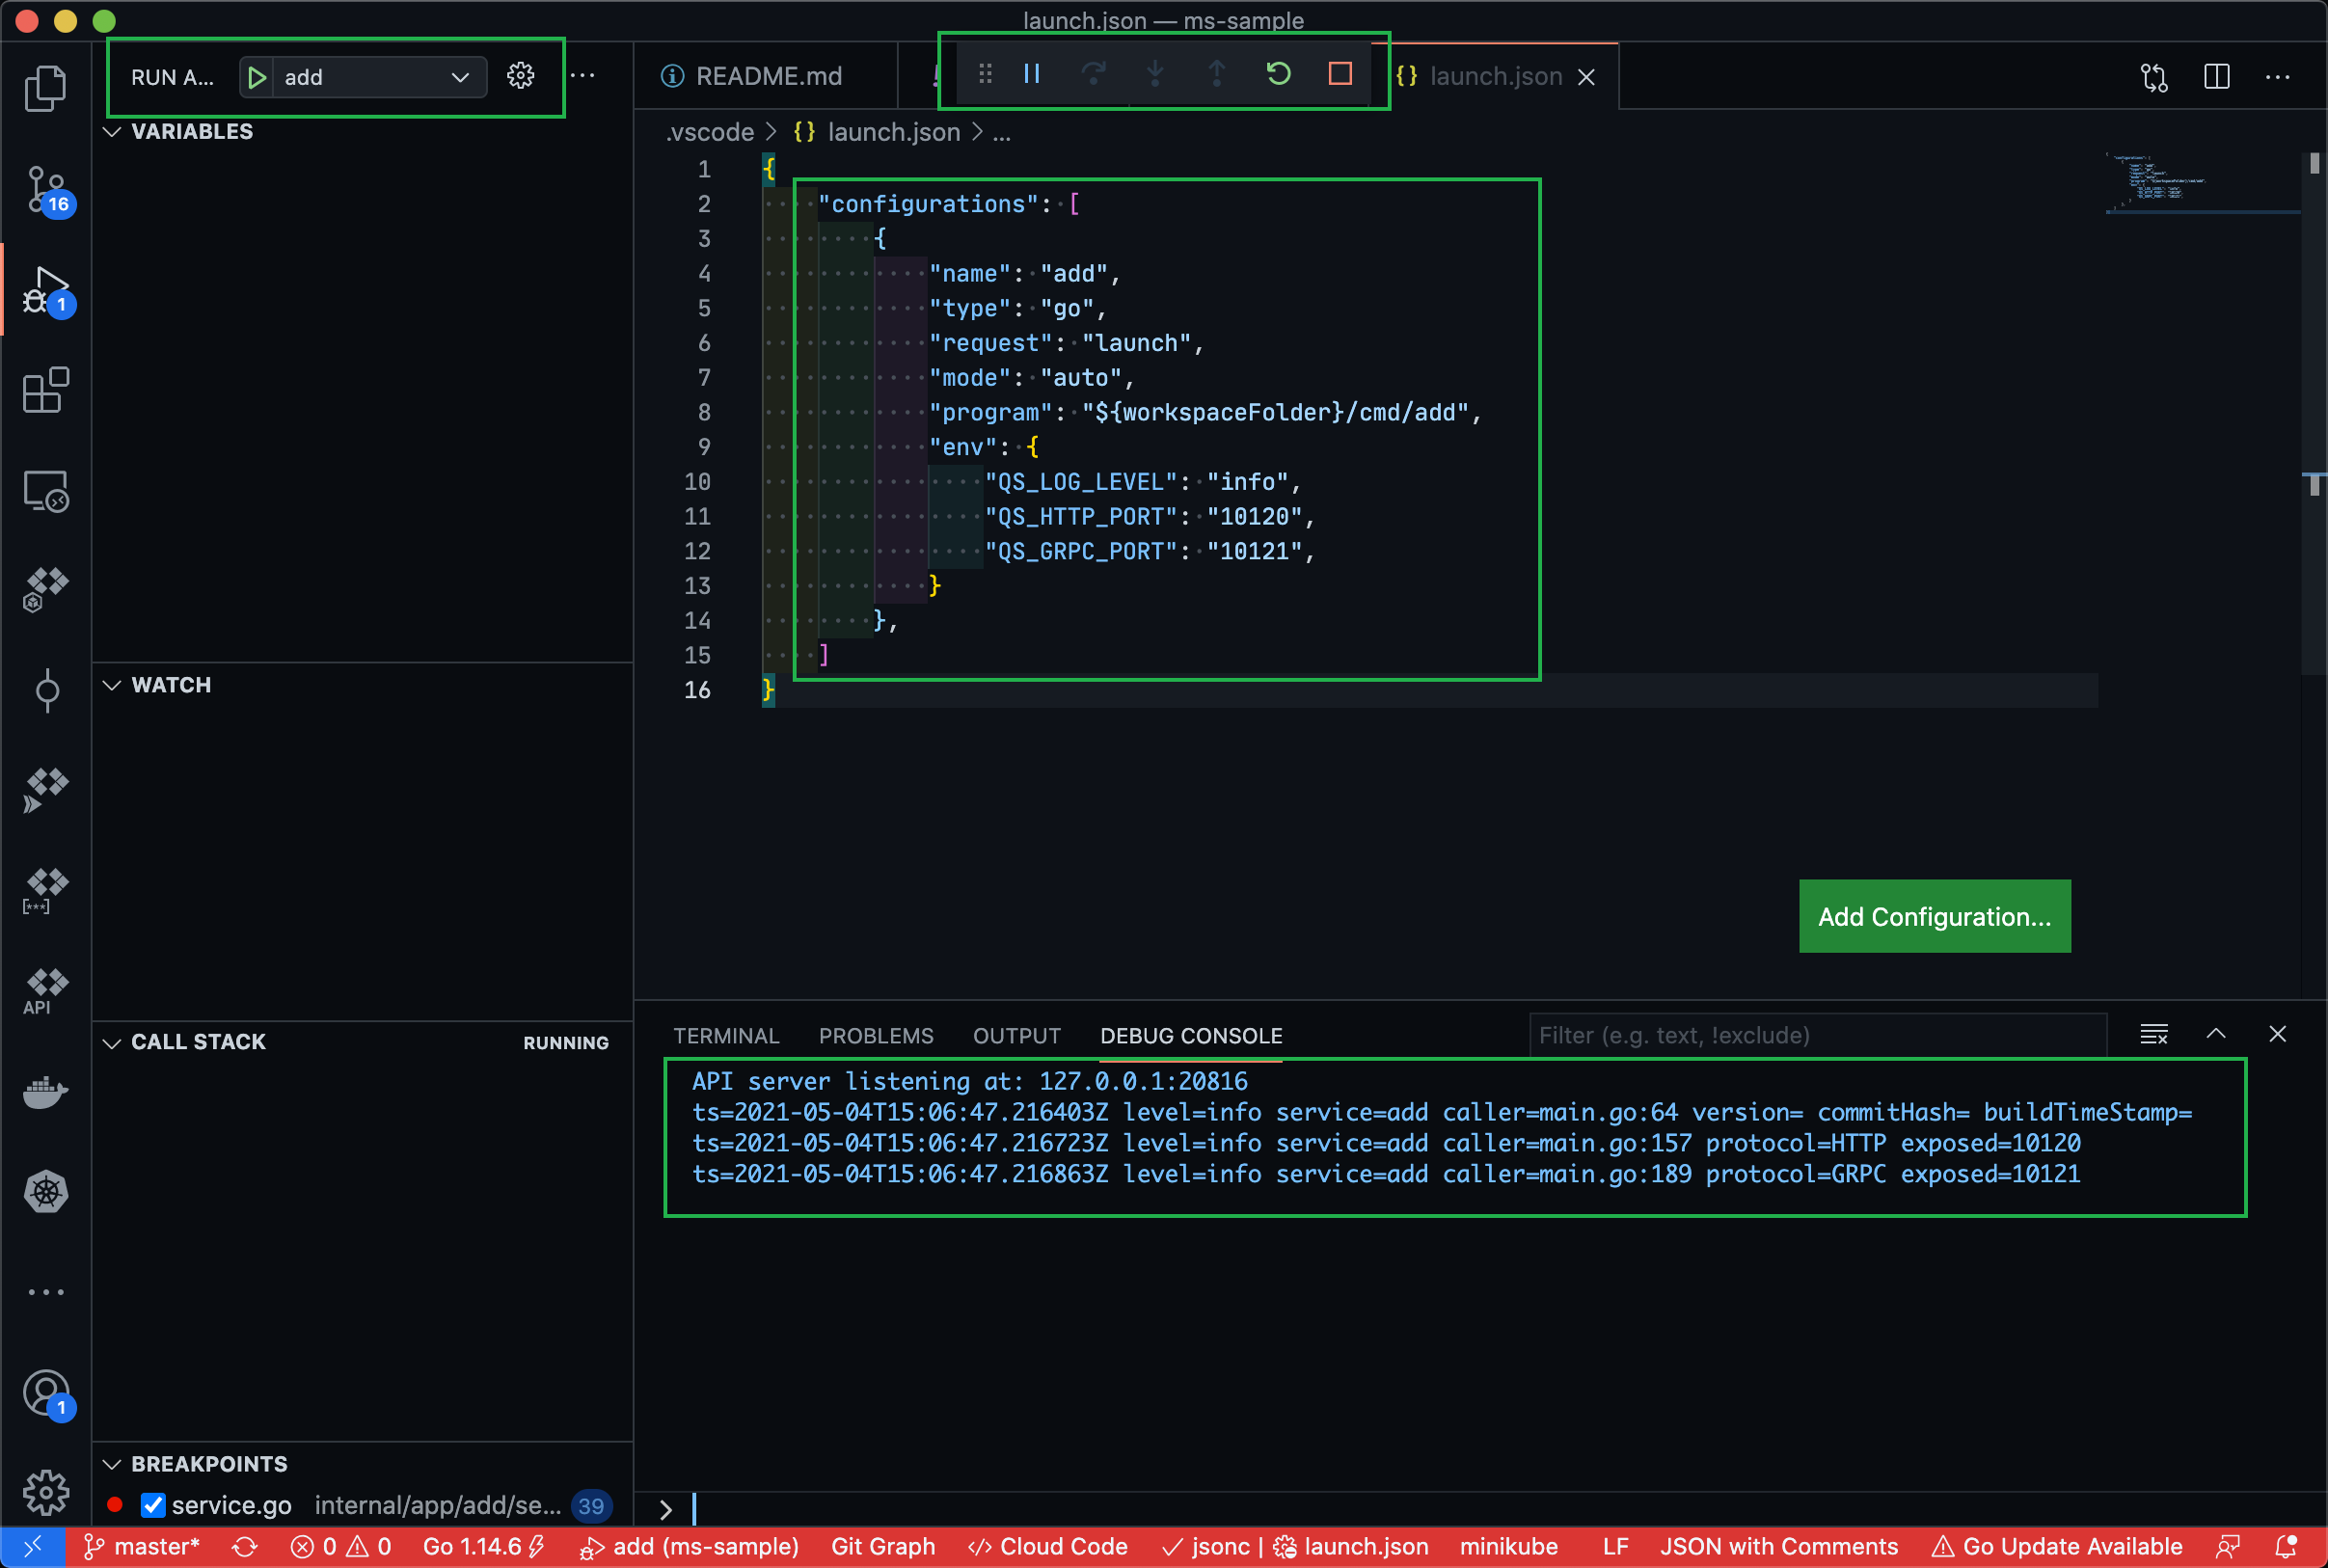
lanuch.json加入 Debug 設定後執行1 2 3 4 5 6 7 8 9 10 11 12 13 14 15 16{ "configurations": [ { "name": "add", "type": "go", "request": "launch", "mode": "auto", "program": "${workspaceFolder}/cmd/add", "env": { "QS_LOG_LEVEL": "info", "QS_HTTP_PORT": "10120", "QS_GRPC_PORT": "10121", } }, ] }
debug 設定
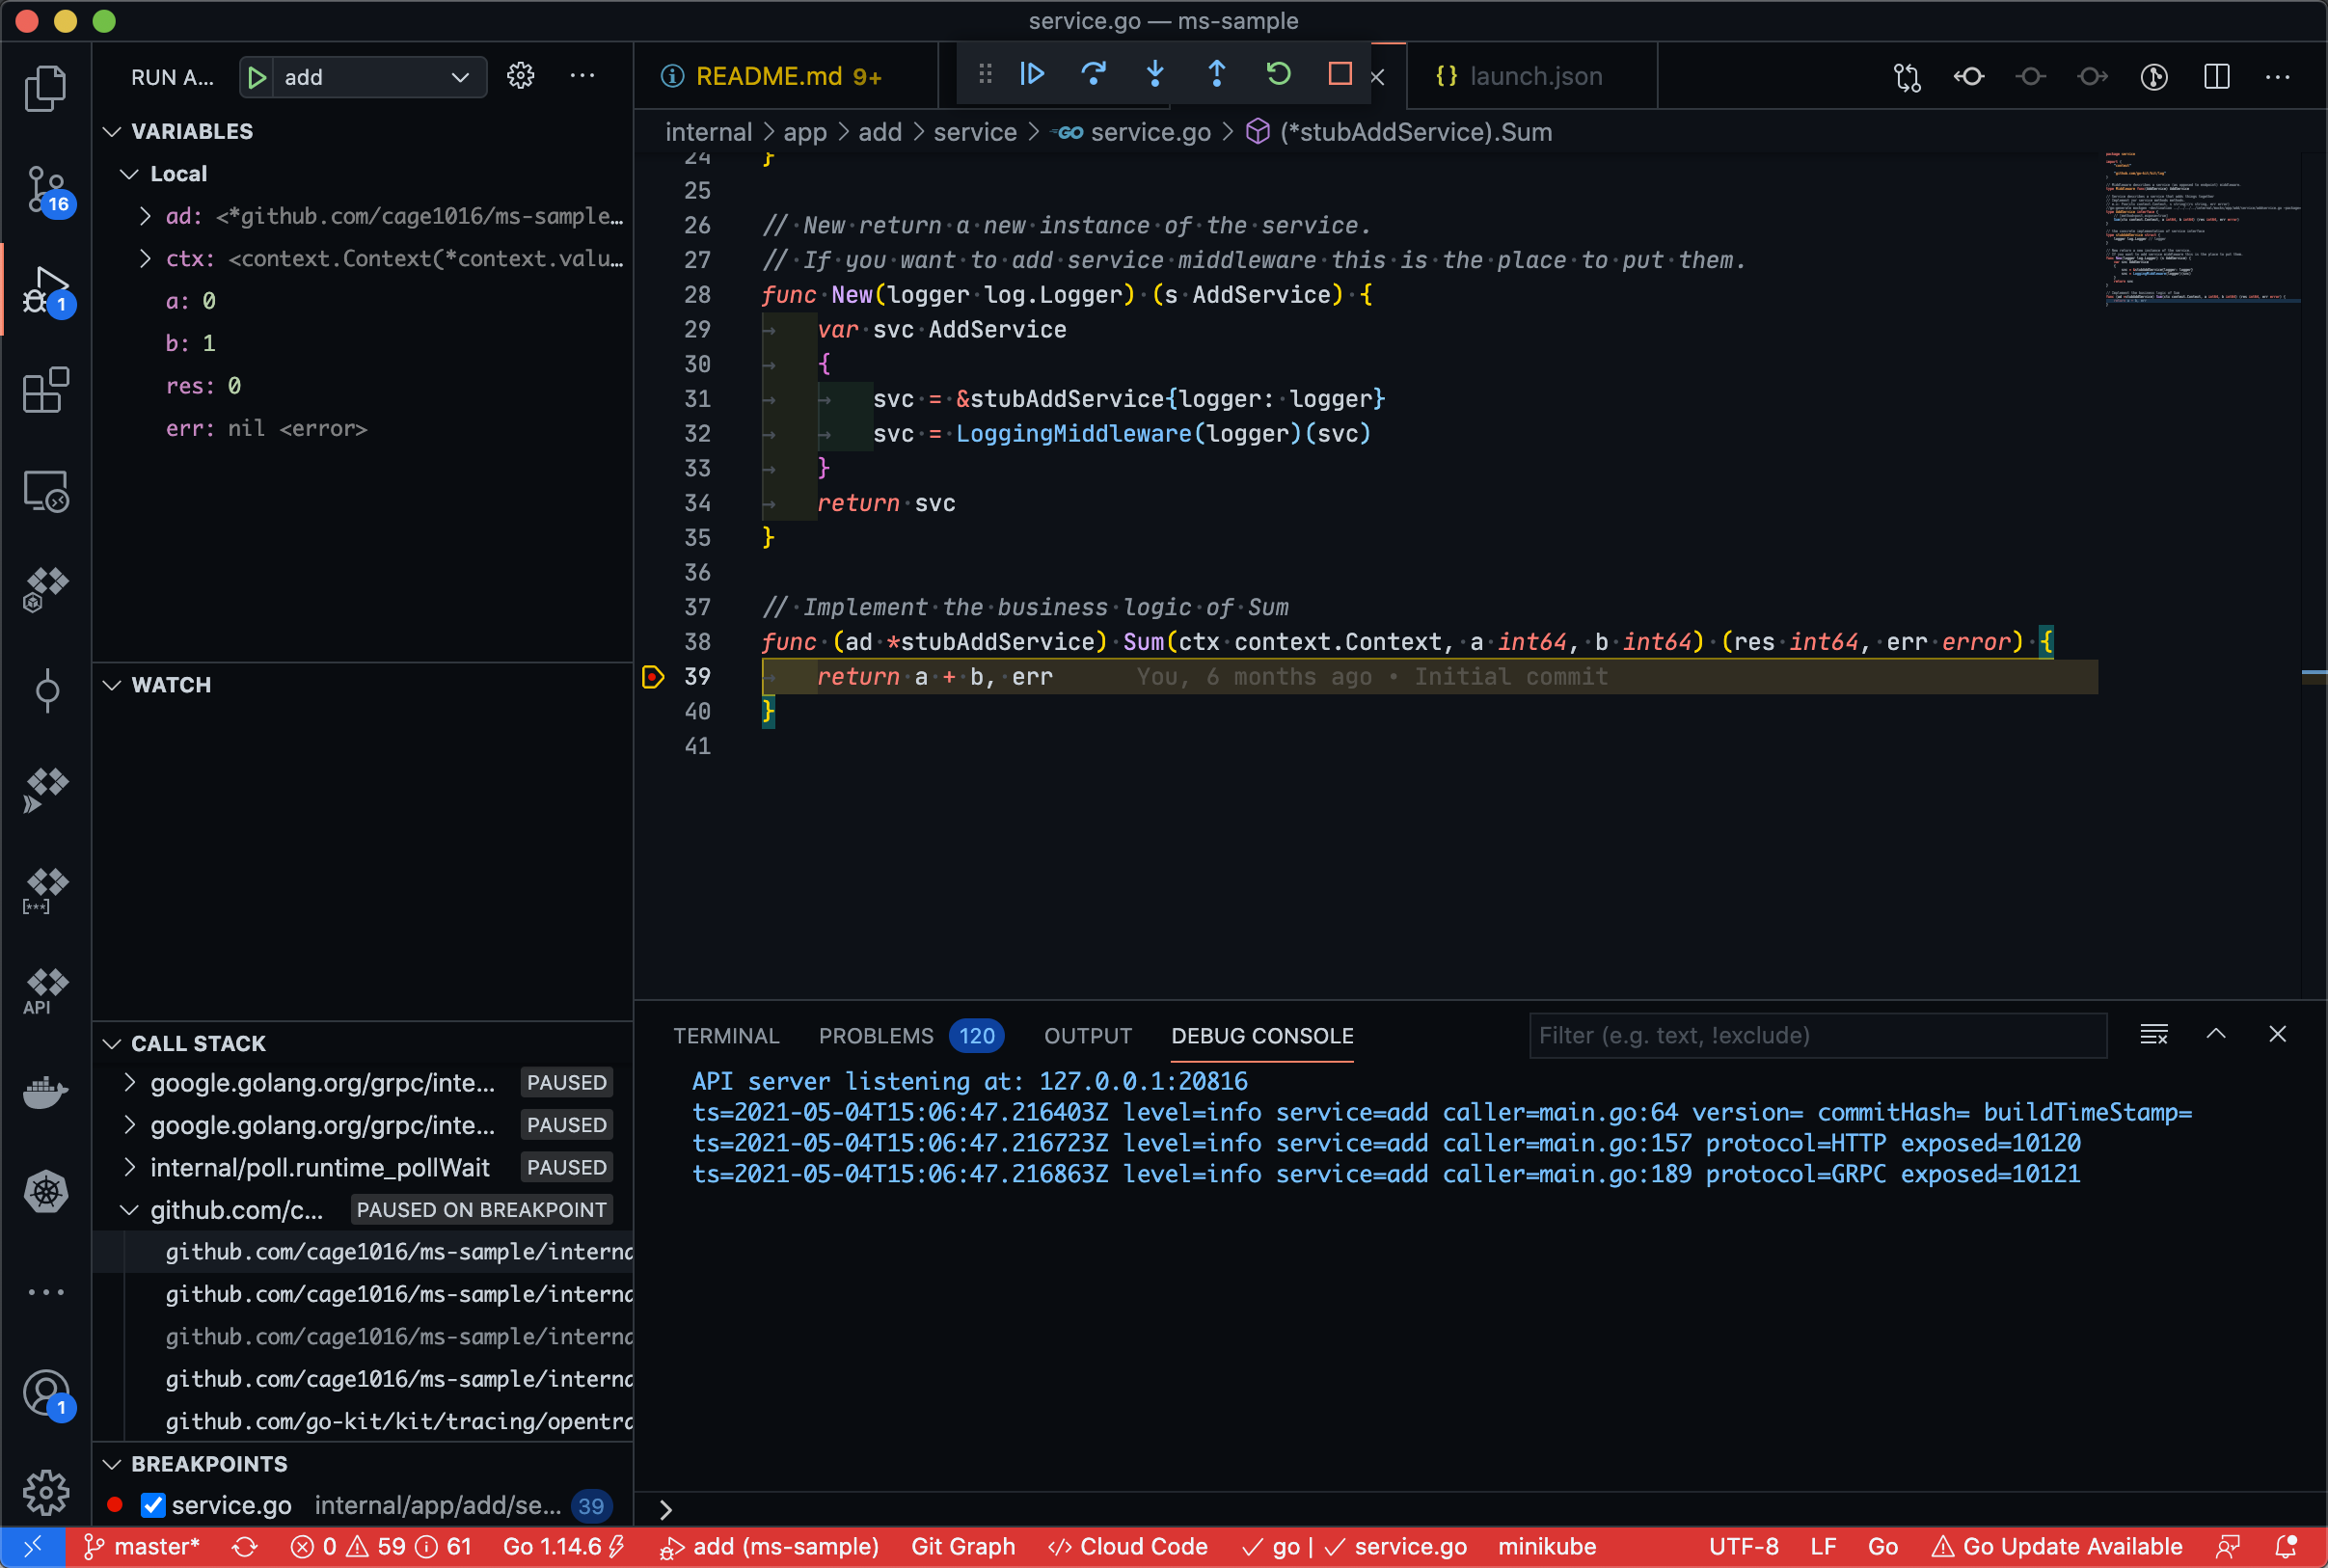
Add服務中斷點debug 獲取
Tictac服務的 URL1 2 3 4 5TICTAC_HTTP_EXTERNAL_PORT=$(kubectl get service tictac-external -o jsonpath='{.spec.ports[?(@.name=="http")].port}') TICTAC_EXTERNAL_HOST=$(kubectl get service tictac-external -o jsonpath='{.status.loadBalancer.ingress[0].hostname}') # TICTAC_EXTERNAL_HOST=$(kubectl get service tictac-external -o jsonpath='{.status.loadBalancer.ingress[0].ip}') # unmark if necessary TICTAC_HTTP_EXTERNAL_URL=$TICTAC_EXTERNAL_HOST:$TICTAC_HTTP_EXTERNAL_PORT echo $TICTAC_HTTP_EXTERNAL_URL使用 curl 進行請求
1curl -X POST $TICTAC_HTTP_EXTERNAL_URL/ticVSCode 中執行中的 Add service 會成功攔截至流量並停在我們設置的中斷點中
debug

header(“x-telepresence-intercept-id”)
Telepresence 除了全流量的攔截之外也支援特定的請求,基本上的操作步驟是一樣的,差異的部份需要先進行 Telepresence login
進行 Telepresence login
1Telepresence login(Optional),如果已經跑過一次 intercept,記得先退出當前的 intercept
1Telepresence leave add一樣進行設定攔截器的配置並加上
--preview-url=false,我們並不需在 Ambassador 上產生 preview url需要 Telepresence login 操作 intercept 才會有特定請求,不然怎麼操作都會是 all TCP connections
1 2 3 4 5 6 7 8 9 10 11telepresence intercept add --service add --port 10121:grpc --preview-url=false Using Deployment add intercepted Intercept name : add State : ACTIVE Workload kind : Deployment Destination : 127.0.0.1:10121 Service Port Identifier: grpc Volume Mount Error : macFUSE 4.0.5 or higher is required on your local machine Intercepting : HTTP requests that match all of: header("x-telepresence-intercept-id") ~= regexp("5b771ea3-8f6a-4be1-82f3-675aa1e28840:add")這時候再使用 curl 進行請求並加上特定的 (x-telepresence-intercept-id) 才會進行攔截,沒有加上 Header 的請求反之不理
1curl -H 'x-telepresence-intercept-id: 5b771ea3-8f6a-4be1-82f3-675aa1e28840:add' -X POST $TICTAC_HTTP_EXTERNAL_URL/ticVSCode 攔截特定請求
這邊一個成功的因素是 tictac tic 呼叫 add sum GRPC 時一同把 header 的 x-telepresence-intercept-id 加到 context 才可以
debug

結論
Teleresence 2 可以有效的降低多個微服務的 debug 體驗,只攔截特定請求更是方便,不需要擔心把微服務咬死,不過目前開發還在進行中,Github community 回報的 issue 還是不少,還是值得一玩。大家可以至 cage1016/ms-demo: gokit microservice demo 中 clone 有所的程式照著操作看看體驗看看